
Introduction - How to Use Retaliate and Totem Stella to Beat Tricephalos
Soloing bosses in Elden Ring Nightreign isn't always easy—especially during the Trice Expedition. However, the Gladius Beast of the Night, known as Tricephalos, is one of the more manageable encounters with the right setup. In this guide, you'll learn how to beat this boss using a Raider build, leveraging two powerful tools: Retaliate and Totem Stella.
Even if you’ve never played Raider before, this class offers a straightforward kit that can carry you through the entire fight. This walkthrough breaks down everything from gear recommendations to phase-by-phase strategies to ensure you get that solo win.
Key Takeaways
-
Use the Retaliate ability to absorb and counter major attacks.
-
Equip a holy weapon to exploit Tricephalos’s elemental weakness.
-
Utilize Totem Stella for both protection and repositioning.
-
Watch out during the three-headed split phase—timing your dodges and heals is crucial.
-
Target posture breaks with high-impact jump attacks.

Understanding the Tricephalos Boss Fight
What Makes Tricephalos Unique
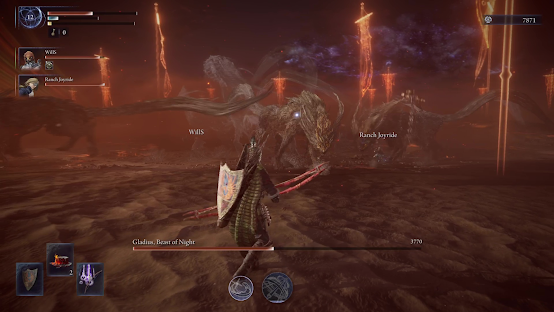
Tricephalos is a two-phase boss with a mid-fight transformation. Initially, you face a single-headed beast with sword-based attacks. Later, it splits into a three-headed form, with each head behaving differently.
-
Sword head: Aggressive and mirrors first-phase attack patterns.
-
Other two heads: Deal continuous pressure with leap attacks.
Dodging and managing your healing during this second phase is the biggest challenge in the fight.
Why Raider Is the Best Solo Class for This Boss
Simple But Effective Kit
The Raider’s kit is direct. It allows newer players to focus on reaction timing and movement without complex combos.
-
Retaliate: Absorbs damage and strikes back, perfect for Tricephalos's constant pressure.
-
Stamina Management: Raider's gear supports extended fighting, especially with two-handed weapons.
Even if you’re not a Raider main, this class can make the fight significantly more manageable.
Recommended Build for Soloing Tricephalos
Weapons and Damage Types
Prioritize a holy-infused weapon. Tricephalos takes increased damage from holy sources. Ideal weapon traits include:
-
Scarlet Rot or Poison: These effects stack over time, increasing overall damage.
-
Posture Damage: Jump attacks with colossal weapons are key to staggering the boss.
Example setup:
-
Rodden Greataxe (infused with holy)
-
Dual colossal weapons for posture break combos
Gear & Level
-
Aim for Level 15+
-
Equip Totem Stella as a movement/defense tool
-
Carry status-inflicting gear if holy weapons are unavailable
Even with mid-tier gear (blue rarity), this fight is winnable if you maintain control and spacing.
Fighting Tricephalos: Phase by Phase
Phase 1: Sword Form
In the first phase, Tricephalos primarily uses melee sword attacks.
Key Tips:
-
Use Retaliate whenever an attack is predictable.
-
Get in quick posture-damaging jump attacks after a successful retaliation.
-
Roll towards and slightly right to avoid large swings.
Once you stagger the boss once, you'll notice a sharp drop in difficulty. That’s your chance to land heavy blows.
Phase 2: Three-Headed Form
The boss splits into three dog-like entities. This is where most runs fail.
Strategy:
-
Back off at the start of the split to assess movement patterns.
-
Focus on dodging until it regroups.
-
Avoid healing during active aggression; instead, reposition and wait for brief pauses.
The sword head stays the most aggressive—Retaliate works best against it.
Phase 3: AoE and Final Phase
Tricephalos eventually reforms and begins using a large area-of-effect attack by driving its sword into the ground.
Avoidance:
-
Watch the boss’s animation closely.
-
Dodge roll back and sideways out of range when the animation starts.
-
Do not stand in front when it glows before the AoE triggers.
After this, the boss alternates between standard attacks and jump-slam combos.
How to Use Totem Stella Efficiently
Totem Stella is more than just a platform. It acts as a defensive stronghold and lets you reset the fight in your favor.
-
Use it to evade group pressure during the three-headed phase.
-
Climb up and apply buffs, restore stamina, or heal.
-
Time your jump attacks from above to do posture damage and holy burst effects.
You’re essentially untouchable for five seconds when used right.
Advanced Tips for Posture Breaks and Damage Windows
Maximize Stagger Potential
Tricephalos is vulnerable to posture breaks if hit with heavy, well-timed strikes:
-
Use dual colossal weapons to chain L1 attacks.
-
Pair Retaliate with jump strikes to break stance quickly.
-
When the boss glows yellow, you're landing holy damage—keep pushing that pressure.
Combining status effects (poison or rot) with holy burst attacks increases your win rate dramatically.
Common Mistakes to Avoid
-
Standing too close during the AoE sword slam
-
Overhealing during the split phase
-
Not using Totem Stella when overwhelmed
-
Skipping Retaliate opportunities to land big counters
Timing and positioning are everything. Rushing in or panicking during splits is what causes most solo failures.

Conclusion: Winning the Fight With Confidence
With the right build and timing, Tricephalos becomes much less intimidating. Use Retaliate smartly, rely on Totem Stella for defense and healing windows, and equip a solid holy weapon.
Stay calm, read the boss's moves, and punish hard after posture breaks. This guide has everything you need to solo Tricephalos—even if you're not overleveled or overgeared.
FAQs
Q1: What weapon should I use to fight Tricephalos in Elden Ring Nightreign?
A holy-infused weapon is ideal. Look for gear with posture-breaking and status effects like poison or Scarlet Rot.
Q2: Is the Raider class good for soloing this boss?
Yes. Raider’s Retaliate skill makes it easy to block and counter Tricephalos’s fast-paced attacks.
Q3: How does Totem Stella help in the fight?
Totem Stella provides a five-second window of safety, allowing you to heal, apply buffs, or reset your positioning during the toughest phases.
Q4: How do I avoid the AoE sword slam attack?
When Tricephalos glows and raises its sword, back away quickly. Avoid standing in front of it during this move.
Q5: What’s the most dangerous part of the Tricephalos fight?
The split phase with three dog forms is the hardest. Avoid getting overwhelmed by backing off and healing when possible.
🎮 Meet Haplo Gaming Chef 🍳
Level 99 Kitchen Warrior here! I'm on a quest to transform your gaming sessions into epic culinary adventures. When I'm not farming rare ingredients in MMOs, I'm crafting real-world recipes inspired by your favorite video games.
Specializing in: • Game-inspired recipe creation • Cooking quest guides • Power-up snacks for gaming sessions • Achievement-worthy meal prep
Join my party as we explore the delicious intersection of pixels and plates. Whether you're a casual foodie or a hardcore gamer, there's always room at my crafting table! #Gaming #GamingGuides #GamingChef #HaploGamingChef For More Visit: https://haplogamingchef.blogspot.com/
Follow Me!
https://bsky.app/profile/haplogamingchef.bsky.social
https://www.threads.com/@haplogamingchef
https://www.twitch.tv/haplogamingchef
https://www.pinterest.com/haplogamingchef
https://www.youtube.com/@HaploGamingChef
https://www.tiktok.com/@haplogamingchef
https://flipboard.com/@HaploGamingChef
https://x.com/HaploGamingChef
https://www.instagram.com/haplogamingchef
https://www.facebook.com/HaploGamingChef
https://www.linkedin.com/in/haplogamingchef
https://haplogamingchef.blogspot.com
https://www.tumblr.com/haplogamingchef
https://medium.com/@haplogamingchef
Google Business Profile: https://g.co/kgs/SLVFpRa


No comments:
Post a Comment